Tutorials
Adding a New State
Roboy often visits different events and you might want him to say something specific, for example mention a company or a sponsor. One way to do this would be to modify an existing state. However, these changes are often discarded as you still want to have the old behaviour. There is a better way: create a new custom state specifically for your needs.
In this tutorial you will learn how to design and implement a new state. To keep everything simple, the state will just ask a yes-no question and listen to the answer. Based on the answer, you will pick one of two replies and choose one of two transitions.
Do you know math?
Let’s start! We are going to add a state that tests whether the interlocutor (person speaking to Roboy) knows some basic math. First, create a new class named DoYouKnowMathState that extends from roboy.dialog.states.definitions.State:
// inside DoYouKnowMathState.java

public class DoYouKnowMathState extends State {

}
Your IDE will notify you that three functions (act(), react(...) and getNextState()) have to be implemented. Let’s add them:
// inside DoYouKnowMathState.java

@Override
public Output act() {
    return null;
}

@Override
public Output react(Interpretation input) {
    return null;
}

@Override
public State getNextState() {
    return null;
}
Additionally, we need a special constructor and a new variable to store the next state for later:
// inside DoYouKnowMathState.java

private State next;

public DoYouKnowMathState(String stateIdentifier, StateParameters params) {
    super(stateIdentifier, params);
}
Now, we can write some logic and define what our new state should do. The act() function is always executed first. In our case, we want to ask a simple question. Replace return null; inside act() with following:
// inside public Output act()

return Output.say("What is 2 plus 2?");
The interlocutor’s answer will be passed to the react(...) function once it is available. Inside, we should check whether the answer is correct and react based on correctness. This code is one of the simplest ways to do this:
// inside public Output react(Interpretation input)

// get tokens (= single words of the input)
String[] tokens = (String[]) input.getFeatures().get(Linguistics.TOKENS);

// check if the answer is correct (simplest version)
if (tokens.length > 0 && tokens[0].equals("four")) {
    // answer correct
    next = getTransition("personKnowsMath");
    return Output.say("You are good at math!");
} else {
    // answer incorrect
    next = getTransition("personDoesNotKnowMath");
    return Output.say("Well, 2 plus 2 is 4!");
}
Note a few things here:
- to keep this tutorial simple, we only check whether the first word of the reply equals “four”
- based on reply correctness, we get the next state using
getTransition(<transitionName>)save it for later - similarly to
act(), we define the output withreturn Output.say(<stringToSay>);
Finally, we can implement the last required function getNextState() that defines the next state to enter. Inside, we just return the next state that we defined inside react(...):
// inside public State getNextState()

return next;
That’s it, you have just created your first state! Here is how the class should look like:
// inside DoYouKnowMathState.java

package roboy.dialog.tutorials.tutorialStates;

import roboy.dialog.states.definitions.State;
import roboy.dialog.states.definitions.StateParameters;
import roboy.linguistics.Linguistics;
import roboy.linguistics.sentenceanalysis.Interpretation;

public class DoYouKnowMathState extends State {

    private State next;

    public DoYouKnowMathState(String stateIdentifier, StateParameters params) {
        super(stateIdentifier, params);
    }

    @Override
    public Output act() {
        return Output.say("What is 2 plus 2?");
    }

    @Override
    public Output react(Interpretation input) {

        // get tokens (= single words of the input)
        String[] tokens = (String[]) input.getFeatures().get(Linguistics.TOKENS);

        // check if the answer is correct (simplest version)
        if (tokens.length > 0 && tokens[0].equals("four")) {
            // answer correct
            next = getTransition("personKnowsMath");
            return Output.say("You are good at math!");

        } else {
            // answer incorrect
            next = getTransition("personDoesNotKnowMath");
            return Output.say("Well, 2 plus 2 is 4!");
        }
    }

    @Override
    public State getNextState() {
        return next;
    }
}
The newest version of the complete code can be found in in roboy.dialog.tutorials.tutorialStates.DoYouKnowMathState. Read the tut_new_personality tutorial to learn how to connect your new state with others.
Example output
When using the new state, you could encounter the conversation:
[Roboy]: What is 2 plus 2?
[You]:   four
[Roboy]: You are good at math!
Or, if you provide a wrong answer:
[Roboy]: What is 2 plus 2?
[You]:   one
[Roboy]: Well, 2 plus 2 is 4!
To learn more details about states and personalities, refer to the Personality and states page. There, you will find details about state fallbacks, parameters and interfaces, as well as more information about different personalities and more output options.
Creating a New Personality
Roboy’s Dialog System can be used in different environments and situations like fairs, conferences, demos or as a chatbot on social networks. For every given situation, Roboy’s behaviour should be different. We use personalities to define Roboy’s way of talking.
In this tutorial you will learn how to create a new personality. Make sure that you know the basic functionality of states. If you are not familiar with them, read the Adding a New State tutorial. General information about personalities can be found on the Personality and states page.
Personalities are defined inside JSON personality files. Each file represents a state machine and defines:
- initial state: state in which Roboy starts the conversation
- transitions: connections between the states and the dialog flow
- fallbacks: backup if a state fails to react to unexpected input
State definition
Every state inside the personality file is defined by a JSON object. Here is an example:
{
  "identifier": "MathTest",
  "implementation" : "roboy.dialog.tutorials.tutorialStates.DoYouKnowMathState",
  "transitions" : {
    "personKnowsMath" : "Farewell",
    "personDoesNotKnowMath" : "Farewell"
  },
  "comment": "A state that will test your math knowledge."
}
We have just defined a state that is called MathTest. Every state must have a unique identifier.
The implementation property defines which Java class should be used for this state when the Dialog System is running. When the Dialog System loads a personality file, it creates a Java object of the right class for every state defined in the file.
It is important to provide the complete class name (including the package) so that the Dialog System can find the right class and instantiate an object of it when loading the file. Special care is needed when doing refactoring. Make sure to change the personality file when you rename a state or move it to a different package!
Next, we have transitions. Here we define the connections between states. You should define all transitions that could be taken by the state implementation. For the DoYouKnowMathState we have two of them: personKnowsMath and personDoesNotKnowMath (look for getTransition(<transitionName>) inside the Java code). In the JSON file, the key is the transition name (e.g. personKnowsMath) and the value (here Farewell) is the identifier of another state in the same personality file (do not confuse with Java class names). We will take a look at the definition of the Farewell state a bit later.
The comment property is optional and will be ignored completely by the Dialog System. It just gives you an option to note some details about the state. There are two additional properties that you can (and sometimes have to) define: parameters and fallback. We will discuss them later as well.
Now, let’s define the Farewell state. We will use one of the pre-implemented toy states. The definition looks like this:
{
  "identifier": "Farewell",
  "implementation" : "roboy.dialog.tutorials.tutorialStates.ToyFarewellState",
  "transitions" : {},
  "comment": "Last state: Tells goodbye, ignores reply, ends the conversation."
}
Nothing new here, except that we have no outgoing transitions for this state. This is because the ToyFarewellState always ends the conversation and will never take any transition.
Complete personality file
With two states defined, we can now take a look at the complete personality file. All state definitions are stored in the states array. Additionally, we define the initialState and pass the identifier MathTest of our DoYouKnowMathState. The complete file looks like this:
{
  "comment": "A simple personality that only contains two states (used in tutorial).",
  "initialState": "MathTest",
  "states": [
    {
      "identifier": "MathTest",
      "implementation" : "roboy.dialog.tutorials.tutorialStates.DoYouKnowMathState",
      "transitions" : {
        "personKnowsMath" : "Farewell",
        "personDoesNotKnowMath" : "Farewell"
      },
      "comment": "A state that will test your math knowledge."
    },
    {
      "identifier": "Farewell",
      "implementation" : "roboy.dialog.tutorials.tutorialStates.ToyFarewellState",
      "transitions" : {},
      "comment": "Last state: Tells goodbye, ignores reply, ends the conversation."
    }
  ]
}
This file is stored under resources/personalityFiles/tutorial/MathTest.json. You can try running this personality by setting the path (PERSONALITY_FILE) in the config file (config.properties).
When you create a new personality file you might forget to define important transitions. To find errors faster, you can define the state interface (required transitions, parameters and fallback) for every state when you implement it. While loading the personality file, the Dialog System will check whether the state has everything it needs and warn you if something is missing. Read more about state interfaces on the Personality and states page.
Fallbacks and parameters
There are two additional properties that you can add to a state definition: parameters and fallback. Take a look at an example:
{
  "identifier": "Intro",
  "implementation": "roboy.dialog.tutorials.tutorialStates.ToyIntroState",
  "transitions": {
    "next": "Farewell"
  },
  "fallback": "RandomAnswer"
  "parameters" : {
    "introductionSentence" : "My name is Roboy!"
  }
}
Let’s take a look at both properties. Here we define RandomAnswer (which is an identifier of another state in the same personality file) as the fallback for the state with identifier Intro. This means that if Intro cannot react to an input, the RandomAnswer will be asked instead. The property parameters allows you to pass parameters to the state. Each parameter has a name (here introductionSentence) and a string value. The state implementation can access the value by the name. Parameters are very useful to pass resource file paths to states. Read more about fallbacks and parameters on the Personality and states page.
Larger personality
It is not easy to create interesting conversations using only two states (assuming relatively simple states of course). Usually, you will use at least five different states in one conversation. To get some experience in writing personality files, let’s create a file that uses four states. Don’t worry, you don’t have to implement the states here. We will use four already pre-implemented toy states that can be found in the roboy.dialog.tutorials.tutorialStates package. The final personality should look like this:
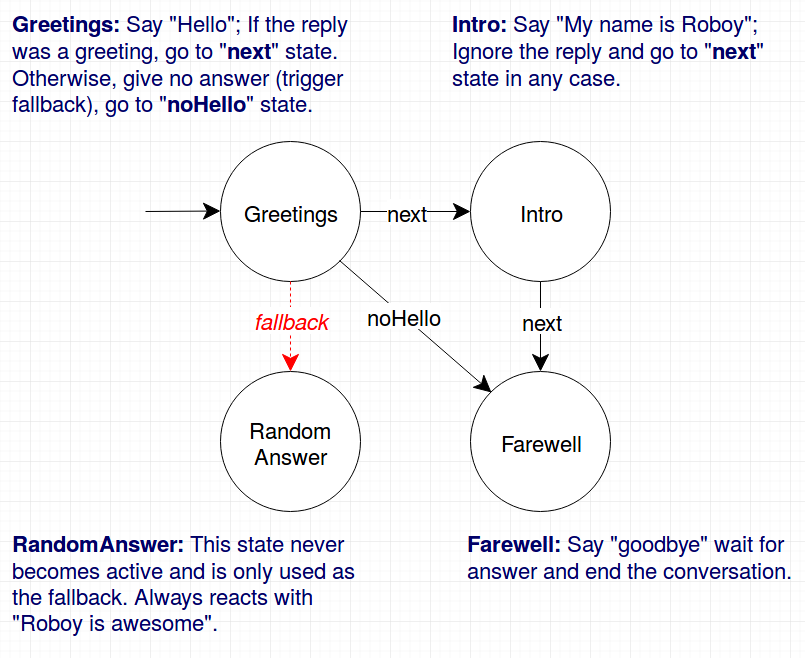
| alt: | Toy personality |
|---|
As you can see, we have four states that are connected to each other. The names of the transitions are denoted on the arrows. Now, try to write a personality file to represent this personality. Following these steps might be helpful:
- read the JavaDoc of every state you will use (
ToyGreetingsState,ToyIntroState,ToyFarewellStateandToyRandomAnswerState) - create a new personality file (you might copy
MathTest.jsonto have an easier start) - create four state definitions with different identifiers (
Greetings,Intro,FarewellandRandomAnswer) - define the initial state of your personality (
Greetings) - define the transitions between the states (note that fallback is not a transition)
- define the fallback for the
Greetingsstate - define required parameters for the
Introstate (read JavaDoc ofToyIntroStatefor details) - save the file in the
resources/peronalityFilesfolder - edit the
config.propertiesfile and changePERSONALITY_FILEto your path - try running the Dialog System
If anything goes wrong, you can always take a look at the solution saved in resources/peronalityFiles/tutorial/ToyStateMachine.json. Happy personalizing!
Why do we need this complexity?
You might be wondering why such a complex system with all those JSON files is needed. It would be much simpler to define all the states and transitions directly from core, right? Defining everything from code would indeed simplify the refactoring. However, definitions inside personality files have some essential advantages. First, you don’t have to recompile the project just to change a personality. Second, in the future, we plan to implement a graphical editor for personalities and therefore need a file format to store the personalities. Using the editor, you will be able to create your own personality with drag & drop and don’t have to worry about writing the personality files manually anymore.
While the editor is not implemented yet, we still have good news for you. You can define personalities directly from code and don’t have to worry about creating a personality file (and updating it while refactoring). This feature is especially useful when writing unit tests for single states or smaller state machines. This tutorial does not cover creating personalities from code but there are good examples in the roboy.dialog.tutorials.StateMachineExamples class. Take a look at it if you need to define personalities from code.
Adding New Questions to the State
There exists a list of questions, we may want Roboy to ask in order to acquire new information about people and the environment. It is stored in the resources directory under sentences/QAList.json and follows the next JSON structure as given:
- “FRIEND_OF”: {
- “Q”: [
- “Who is your best friend?”, “Have I met any of your friends?”, “Do you have a friend whom I have met?”, “Maybe I know some friends of yours. Would you name one?”
], “A”: {
- “SUCCESS”: [
- “Oh, I believe I have met %s they’re nice.”
], “FAILURE”: [
“I don’t think I know them.”]
}, “FUP”: {
- “Q”: [
- “Have you made any new friends, %s?”
], “A”: [
“Oh, I have met %s they’re nice.”]
}
}
Here, we have a set of questions about friends (“FRIEND_OF” intent), so Roboy can learn about friends of the person he is talking to. “SUCCESS” and “FAILURE” are the answerS, Roboy will say if the information input was processed successfully or not, respectively. Follow up questions (“FUP”) are the ones that are used to update the information in the future if the questions (“Q”) were already asked.
We can add a new entry there with a new intent. Let it be “LIKE”:
- “LIKE”: {
- “Q”: [
- “What do you like?”
], “A”: {
- “SUCCESS”: [
- “Me too. I really like %s!”
], “FAILURE”: [
“Well, I do not know what to think about this”]
}, “FUP”: {
- “Q”: [
- “Do you still like, %s?”
], “A”: [
“Maybe, I should consider liking this stuff”]
}
}
Then we have to add a new entry into our local ontology - Neo4jRelationships:
public enum Neo4jRelationships {
    ...
    LIKE("LIKE");

    ...
}
Go back to your state and inside the act() method implement the following logic:
Interlocutor person = Context.getInstance().ACTIVE_INTERLOCUTOR.getValue();

RandomList<String> questions = qaValues.getQuestions(Neo4jRelationships.LIKE);
String question = questions.getRandomElement();
return State.Output.say(question);
Now, we can ask these newly added questions and later process the answers in the react() method.
Querying the Memory from the Dialog System
Indeed, the newly created state may be the pinnacle of State Machines practice, but it does not yet exploit all of the Roboy Dialog System capabilities, such as the graph database Roboy Memory Module which allows to store and recall information about the environment. For instance, you may want to check whether you belong to the circle of Roboy’s friends.
Every state is bundled with the memory reference inside its parameters, to call the memory you have to access it the following way:
Neo4jMemoryInterface memory = getParameters().getMemory();
Then you may want to call one of the most used methods, namely, getById - which will query the Neo4j database and get the description of the node with the same (unique) ID in JSON format. Roboy’s ID is 26.:
String requestedObject = getMemory().getById(26);
MemoryNodeModel roboy = gson.fromJson(requestedObject, MemoryNodeModel.class);
The MemoryNodeModel class is the general class which is a model for the nodes stored in Neo4j. It has a label, an ID, parameters and relationships with other nodes denoted by IDs. As soon as we have the Roboy node we can get his friends’ IDs like this:
ArrayList<Integer> ids = roboy.getRelationships(Neo4jRelationships.FRIEND_OF);
Then we can proceed with checking Roboy’s friends as follows:
RandomList<MemoryNodeModel> roboyFriends = new RandomList<>();

if (ids != null && !ids.isEmpty()) {
    try {
        Gson gson = new Gson();
        for (Integer id : ids) {
            String requestedObject = getParameters().getMemory().getById(id);
            roboyFriends.add(gson.fromJson(requestedObject, MemoryNodeModel.class));
        }
    } catch (InterruptedException | IOException e) {
        logger.error("Error on Memory data retrieval: " + e.getMessage());
    }
}
Let’s check if we are friends with him:
if (!roboyFriends.isEmpty()) {
    for (MemoryNodeModel friend : roboyFriends) {
        if (friend.getProperties().get("name").toString() == myName) {
            success = true;
            break;
        }
    }
}
However, there exists a special Roboy node class initialized in a specific way like this:
Roboy roboy = new Roboy(memory);
It will retrieve and fill all the data for Roboy from the memory.
Furthermore, we wanted to make it less of miserable routine thus there is a helper function in the State superclass, which makes your life much easier:
RandomList<MemoryNodeModel> nodes = retrieveNodesFromMemoryByIds(roboy.getRelationships(Neo4jRelationships.FRIEND_OF));

if (!nodes.isEmpty()) {
    for (MemoryNodeModel node : nodes) {
        if (node.getProperties().get("name").toString() == myName) {
            success = true;
            break;
        }
    }
}
Extending the Lexicon and the Grammar
This tutorial explains how to create or change grammar and lexicon used in the semantic parser.
To create your own custom lexicon, you need to create a new file or copy an existing lexicon and add lexemes in the following format:
{lexeme:"LEXEME", formula:"FORMULA", type:"TYPE"}
where:
- lexeme - is a natural language utterance, e.g., name
- formula - is a semantic representation of the lexeme, e.g., rb:HAS_NAME
- type - is a lexeme type, e.g., NamedEntity, fb:type.any
Additionally, you can also add features in JSON format for map:
{lexeme:"name", formula:"rb:HAS_NAME", type:"DataProperty", features:"{feature1:0.5, feature2:0.3}"}
To create your own custom grammar, you need to create a new file or copy existing grammar and add rules in the following format:
(rule [Category] ([Expression]) ([Function]))
where:
- Category - is a category of rule, for root derivation use $ROOT
- Expression - is a format of text accepted by the rule expressed in your custom categories or names, e.g., $PHRASE, $TOKEN, $Expr
- Function - semantic function that should be applied to specified pattern, e.g., IdentityFn
Example rules:
(rule $ROOT ((what optional) (is optional) $Expr (? optional)) (IdentityFn))
(rule $Expr ($Expr $Conversion) (JoinFn backward))
For in-depth tutorial on expression and function types, refer to original SEMPRE tutorial or documentation
To use created files, you need to set the correct parameter in pom.xml file.
For grammar:
-Grammar.inPaths
For lexicon:
-SimpleLexicon.inPaths
Scoring Functions and Knowledge Retrieval
Currently, our semantic parser uses error retrieval mechanism that can be modified in the following steps:
Move to package:
edu.stanford.nlp.sempre.roboy.score
Implement
edu.stanford.nlp.sempre.roboy.score.ScoringFunctionclass with score method.Add scoring function in constructor of
edu.stanford.nlp.sempre.roboy.ErrorRetrievalclass.
Move to package:
edu.stanford.nlp.sempre.roboy.error
Implement
edu.stanford.nlp.sempre.roboy.error.KnowledgeRetrieverclass with analyze method.Add knowledge retriever in constructor of
edu.stanford.nlp.sempre.roboy.ErrorRetrievalclass.
Editing the Config File
Dialog System is configured using the config.properties file in the root of the project.
ROS configuration
Dialog outsources many tasks to other modules implemented in Pyhton or C++ as ROS packages. In the config file you can enabled/disable ROS modules, choose which packages to use, and set the ROS_MASTER_URI.
- Available ROS packages are:
roboy_gnlp(generative model for answer generation)roboy_memory(Neo4j graph-based memory)roboy_speech_synthesis(text to speech using Cerevoice)roboy_speech_recognition(speech to text using Bing Speech API)roboy_audio(audio source localization)roboy_vision(face recogntion & object classification and localization)roboy_face(triggers emotions)
Example ROS config:
ROS_ENABLED: true
ROS_MASTER_IP: 10.183.49.162
ROS_ACTIVE_PKGS:
  - roboy_memory
  - roboy_speech_synthesis
Inputs and Outputs
A developer can choose how to interact with the dialog system. For example, for debugging purposes there are command line input and output. Importantly, there can be only one input, but many outputs.
- Available inputs are:
cmdlineupd(listens for incoming udp packets in the port specified below)bing(requires Internet connection and theroboy_speech_recognitionROS package)
- Arbitraty of the following outputs can be used simultaniously at the runtime::
cerevoice(requiresroboy_speech_synthesisROS package)cmdlineibm(uses IBM Bluemix, requires Internet connection, user & pass configured below)emotions(requiresroboy_faceROS package)udp(sends packets on the port configure below)
Example IO config:
INPUT: cmdline
OUTPUTS:
 - cmdline
 - ibm
 - cerevoice
Personality
Here you specify the state machine description store in the JSON file containing personality, i.e. states and transitions between them:
PERSONALITY_FILE: "resources/personalityFiles/OrdinaryPersonality.json"
Utilities
Configure third party communication ports, credentials, etc.:
UDP_IN_SOCKET: 55555
UDP_OUT_SOCKET: 55556
UDP_HOST_ADDRESS: 127.0.0.1

PARSER_PORT: 5000

IBM_TTS_USER: x
IBM_TTS_PASS: x
Show the GUI with Context contents during runtime:
CONTEXT_GUI_ENABLED: true