Development tutorials
This page is a collection of useful tutorials if you want to develop or enhance parts of the Dialog System.
Changing the dialog systems behaviour during a conversation
Adding a New State
Roboy often visits different events and you might want him to say something specific, for example mention a company or a sponsor. One way to do this would be to modify an existing state. However, these changes are often discarded as you still want to have the old behaviour. There is a better way: create a new custom state specifically for your needs.
In this tutorial you will learn how to design and implement a new state. To keep everything simple, the state will just ask a yes-no question and listen to the answer. Based on the answer, you will pick one of two replies and choose one of two transitions.
Do you know math?
Let’s start! We are going to add a state that tests whether the interlocutor (person speaking to Roboy) knows some basic math. First, create a new class named DoYouKnowMathState that extends from roboy.dialog.states.definitions.State:
// inside DoYouKnowMathState.java

public class DoYouKnowMathState extends State {

}
Your IDE will notify you that three functions (act(), react(...) and getNextState()) have to be implemented. Let’s add them:
// inside DoYouKnowMathState.java

@Override
public Output act() {
    return null;
}

@Override
public Output react(Interpretation input) {
    return null;
}

@Override
public State getNextState() {
    return null;
}
Additionally, we need a special constructor and a new variable to store the next state for later:
// inside DoYouKnowMathState.java

private State next;

public DoYouKnowMathState(String stateIdentifier, StateParameters params) {
    super(stateIdentifier, params);
}
Now, we can write some logic and define what our new state should do. The act() function is always executed first. In our case, we want to ask a simple question. Replace return null; inside act() with following:
// inside public Output act()

return Output.say("What is 2 plus 2?");
The interlocutor’s answer will be passed to the react(...) function once it is available. Inside, we should check whether the answer is correct and react based on correctness. If we also want to add emotion to our output, setEmotion() method can be used. This code is one of the simplest ways to do this:
// inside public Output react(Interpretation input)

// get tokens (= single words of the input)
List<String> tokens = input.getTokens();

// check if the answer is correct (simplest version)
if (tokens != null && ((List) tokens).size() > 0 && tokens.get(0).equals("four")) {
    // answer correct
    next = getTransition("personKnowsMath");
    return Output.say("You are good at math!").setEmotion(RoboyEmotion.HAPPINESS);
} else {
    // answer incorrect
    next = getTransition("personDoesNotKnowMath");
    return Output.say("Well, 2 plus 2 is 4!").setEmotion(RoboyEmotion.SADNESS);
}
Note a few things here:
- to keep this tutorial simple, we only check whether the first word of the reply equals “four”
- based on reply correctness, we get the next state using
getTransition(<transitionName>)save it for later - similarly to
act(), we define the output withreturn Output.say(<stringToSay>);
Finally, we can implement the last required function getNextState() that defines the next state to enter. Inside, we just return the next state that we defined inside react(...):
// inside public State getNextState()

return next;
That’s it, you have just created your first state! Here is how the class should look like:
// inside DoYouKnowMathState.java

package roboy.dialog.tutorials.tutorialStates;

import roboy.dialog.states.definitions.State;
import roboy.dialog.states.definitions.StateParameters;
import roboy.emotions.RoboyEmotion;
import roboy.linguistics.sentenceanalysis.Interpretation;

public class DoYouKnowMathState extends State {

    private State next;

    public DoYouKnowMathState(String stateIdentifier, StateParameters params) {
        super(stateIdentifier, params);
    }

    @Override
    public Output act() {
        return Output.say("What is 2 plus 2?");
    }

    @Override
    public Output react(Interpretation input) {

        // get tokens (= single words of the input)
        List<String> tokens = input.getTokens();

        // check if the answer is correct (simplest version)
        if (tokens != null && ((List) tokens).size() > 0 && tokens.get(0).equals("four")) {
            // answer correct
            next = getTransition("personKnowsMath");
            return Output.say("You are good at math!").setEmotion(RoboyEmotion.HAPPINESS);

        } else {
            // answer incorrect
            next = getTransition("personDoesNotKnowMath");
            return Output.say("Well, 2 plus 2 is 4!").setEmotion(RoboyEmotion.SADNESS);
        }
    }

    @Override
    public State getNextState() {
        return next;
    }
}
The newest version of the complete code can be found in in roboy.dialog.tutorials.tutorialStates.DoYouKnowMathState. Read the Creating a New Personality tutorial to learn how to connect your new state with others.
Example output
When using the new state, you could encounter the conversation:
[Roboy]: What is 2 plus 2?
[You]:   four
[Roboy]: You are good at math!
Or, if you provide a wrong answer:
[Roboy]: What is 2 plus 2?
[You]:   one
[Roboy]: Well, 2 plus 2 is 4!
To learn more details about states and personalities, refer to Personality and states. There, you will find details about state fallbacks, parameters and interfaces, as well as more information about different personalities and more output options.
Creating a New Personality
Roboy’s Dialog System can be used in different environments and situations like fairs, conferences, demos or as a chatbot on social networks. For every given situation, Roboy’s behaviour should be different. We use personalities to define Roboy’s way of talking.
In this tutorial you will learn how to create a new personality. Make sure that you know the basic functionality of states. If you are not familiar with them, read the Adding a New State tutorial. General information about personalities can be found on Personality and states.
Personalities are defined inside JSON personality files. Each file represents a state machine and defines:
- initial state: state in which Roboy starts the conversation
- transitions: connections between the states and the dialog flow
- fallbacks: backup if a state fails to react to unexpected input
State definition
Every state inside the personality file is defined by a JSON object. Here is an example:
{
  "identifier": "MathTest",
  "implementation" : "roboy.dialog.tutorials.tutorialStates.DoYouKnowMathState",
  "transitions" : {
    "personKnowsMath" : "Farewell",
    "personDoesNotKnowMath" : "Farewell"
  },
  "comment": "A state that will test your math knowledge."
}
We have just defined a state that is called MathTest. Every state must have a unique identifier.
The implementation property defines which Java class should be used for this state when the Dialog System is running. When the Dialog System loads a personality file, it creates a Java object of the right class for every state defined in the file.
It is important to provide the complete class name (including the package) so that the Dialog System can find the right class and instantiate an object of it when loading the file. Special care is needed when doing refactoring. Make sure to change the personality file when you rename a state or move it to a different package!
Next, we have transitions. Here we define the connections between states. You should define all transitions that could be taken by the state implementation. For the DoYouKnowMathState we have two of them: personKnowsMath and personDoesNotKnowMath (look for getTransition(<transitionName>) inside the Java code). In the JSON file, the key is the transition name (e.g. personKnowsMath) and the value (here Farewell) is the identifier of another state in the same personality file (do not confuse with Java class names). We will take a look at the definition of the Farewell state a bit later.
The comment property is optional and will be ignored completely by the Dialog System. It just gives you an option to note some details about the state. There are two additional properties that you can (and sometimes have to) define: parameters and fallback. We will discuss them later as well.
Now, let’s define the Farewell state. We will use one of the pre-implemented toy states. The definition looks like this:
{
  "identifier": "Farewell",
  "implementation" : "roboy.dialog.tutorials.tutorialStates.ToyFarewellState",
  "transitions" : {},
  "comment": "Last state: Tells goodbye, ignores reply, ends the conversation."
}
Nothing new here, except that we have no outgoing transitions for this state. This is because the ToyFarewellState always ends the conversation and will never take any transition.
Complete personality file
With two states defined, we can now take a look at the complete personality file. All state definitions are stored in the states array. Additionally, we define the initialState and pass the identifier MathTest of our DoYouKnowMathState. The complete file looks like this:
{
  "comment": "A simple personality that only contains two states (used in tutorial).",
  "initialState": "MathTest",
  "states": [
    {
      "identifier": "MathTest",
      "implementation" : "roboy.dialog.tutorials.tutorialStates.DoYouKnowMathState",
      "transitions" : {
        "personKnowsMath" : "Farewell",
        "personDoesNotKnowMath" : "Farewell"
      },
      "comment": "A state that will test your math knowledge."
    },
    {
      "identifier": "Farewell",
      "implementation" : "roboy.dialog.tutorials.tutorialStates.ToyFarewellState",
      "transitions" : {},
      "comment": "Last state: Tells goodbye, ignores reply, ends the conversation."
    }
  ]
}
This file is stored under resources/personalityFiles/tutorial/MathTest.json. You can try running this personality by setting the path (PERSONALITY_FILE) in the config file (config.properties).
When you create a new personality file you might forget to define important transitions. To find errors faster, you can define the state interface (required transitions, parameters and fallback) for every state when you implement it. While loading the personality file, the Dialog System will check whether the state has everything it needs and warn you if something is missing. Read more about state interfaces on Personality and states.
Fallbacks and parameters
There are two additional properties that you can add to a state definition: parameters and fallback. Take a look at an example:
{
  "identifier": "Intro",
  "implementation": "roboy.dialog.tutorials.tutorialStates.ToyIntroState",
  "transitions": {
    "next": "Farewell"
  },
  "fallback": "RandomAnswer"
  "parameters" : {
    "introductionSentence" : "My name is Roboy!"
  }
}
Let’s take a look at both properties. Here we define RandomAnswer (which is an identifier of another state in the same personality file) as the fallback for the state with identifier Intro. This means that if Intro cannot react to an input, the RandomAnswer will be asked instead. The property parameters allows you to pass parameters to the state. Each parameter has a name (here introductionSentence) and a string value. The state implementation can access the value by the name. Parameters are very useful to pass resource file paths to states. Read more about fallbacks and parameters on Personality and states.
Larger personality
It is not easy to create interesting conversations using only two states (assuming relatively simple states of course). Usually, you will use at least five different states in one conversation. To get some experience in writing personality files, let’s create a file that uses four states. Don’t worry, you don’t have to implement the states here. We will use four already pre-implemented toy states that can be found in the roboy.dialog.tutorials.tutorialStates package. The final personality should look like this:
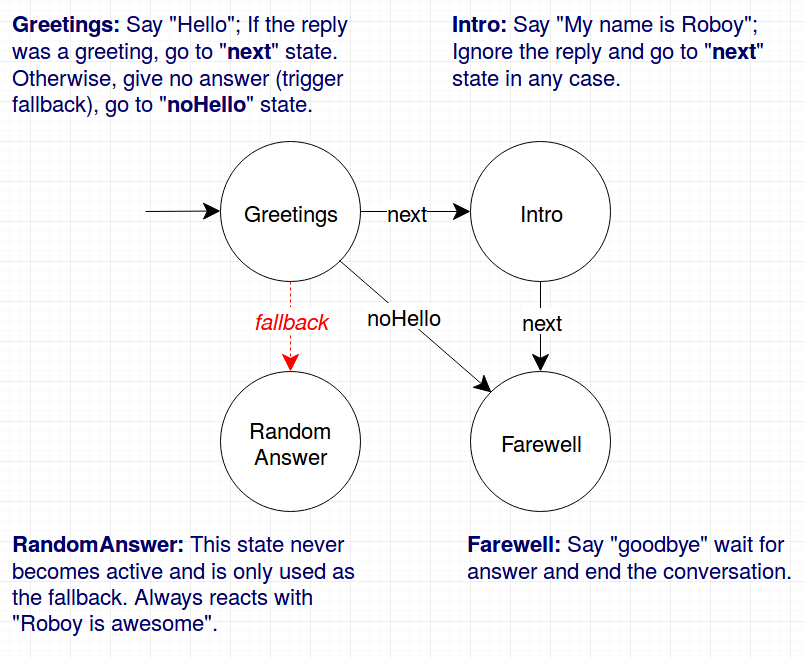
As you can see, we have four states that are connected to each other. The names of the transitions are denoted on the arrows. Now, try to write a personality file to represent this personality. Following these steps might be helpful:
- read the JavaDoc of every state you will use (
ToyGreetingsState,ToyIntroState,ToyFarewellStateandToyRandomAnswerState) - create a new personality file (you might copy
MathTest.jsonto have an easier start) - create four state definitions with different identifiers (
Greetings,Intro,FarewellandRandomAnswer) - define the initial state of your personality (
Greetings) - define the transitions between the states (note that fallback is not a transition)
- define the fallback for the
Greetingsstate - define required parameters for the
Introstate (read JavaDoc ofToyIntroStatefor details) - save the file in the
resources/peronalityFilesfolder - edit the
config.propertiesfile and changePERSONALITY_FILEto your path - try running the Dialog System
If anything goes wrong, you can always take a look at the solution saved in resources/peronalityFiles/tutorial/ToyStateMachine.json. Happy personalizing!
Why do we need this complexity?
You might be wondering why such a complex system with all those JSON files is needed. It would be much simpler to define all the states and transitions directly from core, right? Defining everything from code would indeed simplify the refactoring. However, definitions inside personality files have some essential advantages. First, you don’t have to recompile the project just to change a personality. Second, in the future, we plan to implement a graphical editor for personalities and therefore need a file format to store the personalities. Using the editor, you will be able to create your own personality with drag & drop and don’t have to worry about writing the personality files manually anymore.
While the editor is not implemented yet, we still have good news for you. You can define personalities directly from code and don’t have to worry about creating a personality file (and updating it while refactoring). This feature is especially useful when writing unit tests for single states or smaller state machines. This tutorial does not cover creating personalities from code but there are good examples in the roboy.dialog.tutorials.StateMachineExamples class. Take a look at it if you need to define personalities from code.
Adding New Questions to the State
There exists a list of questions, we may want Roboy to ask in order to acquire new information about people and the environment. It is stored in the resources directory under sentences/QAList.json and follows the next JSON structure as given:
- “FRIEND_OF”: {
- “Q”: [
- “Who is your best friend?”, “Have I met any of your friends?”, “Do you have a friend whom I have met?”, “Maybe I know some friends of yours. Would you name one?”
], “A”: {
- “SUCCESS”: [
- “Oh, I believe I have met %s they’re nice.”
], “FAILURE”: [
“I don’t think I know them.”]
}, “FUP”: {
- “Q”: [
- “Have you made any new friends, %s?”
], “A”: [
“Oh, I have met %s they’re nice.”]
}
}
Here, we have a set of questions about friends (“FRIEND_OF” intent), so Roboy can learn about friends of the person he is talking to. “SUCCESS” and “FAILURE” are the answerS, Roboy will say if the information input was processed successfully or not, respectively. Follow up questions (“FUP”) are the ones that are used to update the information in the future if the questions (“Q”) were already asked.
We can add a new entry there with a new intent. Let it be “LIKE”:
- “LIKE”: {
- “Q”: [
- “What do you like?”
], “A”: {
- “SUCCESS”: [
- “Me too. I really like %s!”
], “FAILURE”: [
“Well, I do not know what to think about this”]
}, “FUP”: {
- “Q”: [
- “Do you still like, %s?”
], “A”: [
“Maybe, I should consider liking this stuff”]
}
}
Then we have to add a new entry into our local ontology - Neo4jRelationships:
public enum Neo4jRelationships {
    ...
    LIKE("LIKE");

    ...
}
Go back to your state and inside the act() method implement the following logic:
Interlocutor person = getContext().ACTIVE_INTERLOCUTOR.getValue();

RandomList<String> questions = qaValues.getQuestions(Neo4jRelationships.LIKE);
String question = questions.getRandomElement();
return State.Output.say(question);
Now, we can ask these newly added questions and later process the answers in the react() method.
Querying the Memory from the Dialog System
Indeed, the newly created state may be the pinnacle of State Machines practice, but it does not yet exploit all of the Roboy Dialog System capabilities, such as the graph database Roboy Memory Module which allows to store and recall information about the environment. For instance, you may want to check whether you belong to the circle of Roboy’s friends.
Every state is bundled with the memory reference inside its parameters, to call the memory you have to access it the following way:
Neo4jMemoryInterface memory = getParameters().getMemory();
Then you may want to call one of the most used methods, namely, getById - which will query the Neo4j database and get the description of the node with the same (unique) ID in JSON format. Roboy’s ID is 26.:
String requestedObject = getMemory().getById(26);
MemoryNodeModel roboy = gson.fromJson(requestedObject, MemoryNodeModel.class);
The MemoryNodeModel class is the general class which is a model for the nodes stored in Neo4j. It has a label, an ID, parameters and relationships with other nodes denoted by IDs. As soon as we have the Roboy node we can get his friends’ IDs like this:
ArrayList<Integer> ids = roboy.getRelationships(Neo4jRelationships.FRIEND_OF);
Then we can proceed with checking Roboy’s friends as follows:
RandomList<MemoryNodeModel> roboyFriends = new RandomList<>();

if (ids != null && !ids.isEmpty()) {
    try {
        Gson gson = new Gson();
        for (Integer id : ids) {
            String requestedObject = getParameters().getMemory().getById(id);
            roboyFriends.add(gson.fromJson(requestedObject, MemoryNodeModel.class));
        }
    } catch (InterruptedException | IOException e) {
        logger.error("Error on Memory data retrieval: " + e.getMessage());
    }
}
Let’s check if we are friends with him:
if (!roboyFriends.isEmpty()) {
    for (MemoryNodeModel friend : roboyFriends) {
        if (friend.getProperties().get("name").toString() == myName) {
            success = true;
            break;
        }
    }
}
However, there exists a special Roboy node class initialized in a specific way like this:
Roboy roboy = new Roboy(memory);
It will retrieve and fill all the data for Roboy from the memory.
Furthermore, we wanted to make it less of miserable routine thus there is a helper function in the State superclass, which makes your life much easier:
RandomList<MemoryNodeModel> nodes = retrieveNodesFromMemoryByIds(roboy.getRelationships(Neo4jRelationships.FRIEND_OF));

if (!nodes.isEmpty()) {
    for (MemoryNodeModel node : nodes) {
        if (node.getProperties().get("name").toString() == myName) {
            success = true;
            break;
        }
    }
}
Creating a Value History / Storing and Updating Values in the Context
Extending the Lexicon and the Grammar
This tutorial explains how to create or change grammar and lexicon used in the semantic parser.
To create your own custom lexicon, you need to create a new file or copy an existing lexicon and add lexemes in the following format:
{lexeme:"LEXEME", formula:"FORMULA", type:"TYPE"}
where:
- lexeme - is a natural language utterance, e.g., name
- formula - is a semantic representation of the lexeme, e.g., rb:HAS_NAME
- type - is a lexeme type, e.g., NamedEntity, fb:type.any
Additionally, you can also add features in JSON format for map:
{lexeme:"name", formula:"rb:HAS_NAME", type:"DataProperty", features:"{feature1:0.5, feature2:0.3}"}
To create your own custom grammar, you need to create a new file or copy existing grammar and add rules in the following format:
(rule [Category] ([Expression]) ([Function]))
where:
- Category - is a category of rule, for root derivation use $ROOT
- Expression - is a format of text accepted by the rule expressed in your custom categories or names, e.g., $PHRASE, $TOKEN, $Expr
- Function - semantic function that should be applied to specified pattern, e.g., IdentityFn
Example rules:
(rule $ROOT ((what optional) (is optional) $Expr (? optional)) (IdentityFn))
(rule $Expr ($Expr $Conversion) (JoinFn backward))
For in-depth tutorial on expression and function types, refer to original SEMPRE tutorial or documentation
To use created files, you need to set the correct parameter in pom.xml file.
For grammar:
-Grammar.inPaths
For lexicon:
-SimpleLexicon.inPaths
Scoring Functions and Knowledge Retrieval
Currently, our semantic parser uses error retrieval mechanism that can be modified in the following steps:
Move to package:
edu.stanford.nlp.sempre.roboy.score
Implement
edu.stanford.nlp.sempre.roboy.score.ScoringFunctionclass with score method.Add scoring function in constructor of
edu.stanford.nlp.sempre.roboy.ErrorRetrievalclass.
Move to package:
edu.stanford.nlp.sempre.roboy.error
Implement
edu.stanford.nlp.sempre.roboy.error.KnowledgeRetrieverclass with analyze method.Add knowledge retriever in constructor of
edu.stanford.nlp.sempre.roboy.ErrorRetrievalclass.
Using the Context
How to add Values?
Here we describe how a new Value can be created and added to the Context. Sample implementations can be found inside roboy.context.contextObjects package.
- Consider what type of data will be stored in the Value. For this example, we chose
String. - In the
contextObjectsdirectory, create a new class which inherits from the Value class. The final signature should look similar to:public class SampleValue extends Value<String>(replacing String with your type). - Make the value available for the Dialog System by defining a
ValueInterfacein theContext.javaclass, among other class variables. AValueInterfacetakes two type parameters: theValueclass created in step 2, and its data type (in our case,String). Example:public final ValueInterface<SampleValue, String> SAMPLE_VALUE = new ValueInterface<>(new SampleValue()); - Congratulations, you can now query the new Value object! …but it does not receive any values yet. To change this, see “How to add Updaters?” below.
How to add ValueHistories?
ValueHistories extend the functionality of Values by storing all data objects sent to them. Over the getNLastValues(int n) method, a map with several most recent data objects can be retrieved, including their ordering. The contains(V value) method checks whether an object is currently found in the history - note that ValueHistories have size limits, therefore oldest values disappear from the history when new ones are added.
Adding a ValueHistory is very much alike to adding a Value, just make sure to:
- extend
ValueHistory<>instead ofValue<>. If the history should keep more than the default 50 values, override the getMaxLimit() method to return your desired limit value. - in
Context.java, create aHistoryInterfaceinstead ofValueInterface.
How to add Updaters?
New values can only flow into the Context over an Updater instance. Internal Updaters can be used by the dialog manager to actively add new values. External Updaters run in separate threads and query or listen for new values, for example over a ROS connection.
Updaters only add a single new data unit, relying on the AbstractValue.updateValue() method. Thanks to the inheritance chain, you can use an arbitrary Value or ValueHistory implementation as the target of an updater.
Currently, there are two implementations of an External Updater: PeriodicUpdater and ROSTopicUpdater.
PeriodicUpdater calls an updating method after a certain time interval has passed. To use the periodic updating functionality:
- Create a class extending
PeriodicUpdaterand implement itsupdate()method. It should retrieve the values and finally add them over thetarget.updateValue(value)method call. - A constructor is required for the class. Simply match the PeriodicUpdater constructor and call
super(target)within - or use the two-parameter constructor to change the update frequency (by default 1 second).
ROSTopicUpdater subscribes itself to a ROS Topic and reacts to messages coming from the topic. To use:
- Create a class extending
ROSTopicUpdaterand define thegetTargetSubscriber()method, which will point the updater towards its target ROS topic. The options for the subscriber can be found in theRosSubscribers.javaclass. - Implement the
update()method of the new class. This method will be called whenever a new message is stored in the internalmessagevariable, so it might be enough to just calltarget.updateValue(message). If the data needs to be extracted from the message first, do it in theupdate()before callingtarget.updateValue.
All External Updaters need to be initialized in the Context.java class. To do this:
- Define the External Updater a private class variable to the
Context.javaclass (look for the external updater definition section).
- If the Updater depends on ROS, add its initialization into the
Context.initializeROS(RosMainNode ros)method, otherwise add it to the private constructorContext(). As the parameter, use the innervalueorvalueHistoryvariable from aValueInterfaceor aHistoryInterface.
- Create a class extending InternalUpdater<targetClass, valueType>. The class and data type of the target
ValueorValueHistoryare the generic parameters for the updater. - A constructor is required for the class. Simply match the InternalUpdater constructor and call
super(target)within. An example is in theDialogTopicsUpdaterclass.
- Define the Internal Updater in the
Context.javaclass. Initialize the updater within the privateContext()constructor. For example:
public final SampleUpdater SAMPLE_UPDATER; // Define as class variable
SAMPLE_UPDATER = new SampleUpdater(DIALOG_TOPICS.valueHistory); // Initialize in the constructor
Adding generic Input- or OutputDevice
In order to add new roboy.io.InputDevice and roboy.io.OutputDevice classes, changes in multiple locations are necessary.
- Implement your
InputDeviceorOutputDeviceimplementation usingclass [YOUR CLASSNAME] extends InputDevice(or OutputDevice, if you’re doing output). - If your device needs additional cleaning in order to be destroyed properly, additionally use
implements CleanUpand implement thecleanup()method. - Add your devices to
roboy.util.ioingetInputs()andgetOutputs(), so the dialog system may use them if they’re chosen in the configuration. - Add a (commented) input/output configuration to
config.properties. (See Adding new entries to config.properties how to do this)
Adding new entries to config.properties
In order to add a new configuration possibility, changes in config.properties and roboy.util.ConfigManager are necessary. This tutorial will use the boolean example of DEMO_MODE so it may be retraced by looking at the existing code.
Add a new property to
config.propertiesDEMO_MODE: false
Add your new value and a default initialization to the top of``roboy.util.ConfigManager``
public static boolean DEMO_MODE = false;
Read the new value from
config.propertiesin the lower part ofroboy.util.ConfigManagerDEMO_MODE = yamlConfig.getBoolean("DEMO_MODE");
Social Media Integration
A new InputDevice for a social media
First create a new class in roboy.io folder, namely
MySocialMediaInputthat implements fromroboy.io.InputDevice.One function namely “listen()” must be implemented. This function is called by a thread and should return a new
Inputor keep the thread waiting if there isn’t any newInputavailable. Since we want our social media input to support timeout because people often just do not answer on social media, we will implementlisten(long timeout)and the call this one inlisten().Since you will have an
InputDevicefor each user then you need at least a unique identifier for each user right? So each of this unique identifiers should mapped to anInputDevice. And since a generic social media input device is structured in a way that a single entry point is necessary, you need a central point to find all our inputdevices. Therefore, create a static hashmap for it as follows.Note
In further steps unique identifier mentioned as uuid
Add a constructor that receives the uuid as parameter
At this point, we received the uuid and have a hashmap of each
MySocialMediaInput. What else we need to implement?: - Return messages asroboy.io.Inputin thelisten(long timeout)method - Receive the messagesNote
The order is actually reversed for the sake of tutorial of course you need to receive messages before you return them.
Let’s continue with first one. To return a message we need a message so create a
Stringfor it right below theHashMap.We need to initialize it in constructor. Add the following into the beginning of constructor.
Now, we’ll write the message processing logic.
To finish the listen method we also need to properly handle what happens if we did not recieve a new message before the timeout. In that case we need to find the uuid associated with this input and then stop the Conversation for it. The complete
listen(long timeout)now looks like this:Nice, now only thing to worry about is how to receive the message.
Note
There is no
SocialMediaHandleras template. You should have a handler or any logic that receive the messages from your soical media. Then you need to call this function after applied your logic (e.g. wait for a certain time to answer.)Create a static
onUpdate(Pair<String, String>)function that will be called from yourSocialMediaHandlerclass with pair parameter that consits of the uuid and the message.To create the uuid that we discussed before, get the unique identifier from the
update. And add a social media name as prefix.Note
Why we add a prefix? Because it is possible if there is a same identifier from another social media.
Now we need to get the input device there is an existing one with the uuid.
As you can see if there is no inputdevice with respective uuid.
ConversationManager.spawnConversation(uuid)is used. It magically creates the inputDevice (as well as the Conversation and the magical stuff that you do not need to worry about)Since you needed to store references to your devices in the hashmap, you need to delete them when a conversation is over so the garbage collector can delete them. Therefore the device needs cleaning. Finally, implement another interface namely
CleanUpand override itscleanup()method.Done! Congratulations, you have just created your social media input device. . But it doesn’t work with only input device you also need to an output device for each conversation to send the output.
A new OutputDevice for a social media
You have perfectly working input device for your social media. But that only for receiving messages, we also need to send messages.
Create a new class in
roboy.iofolder namelyMySocialMediaOutputthat implements fromroboy.io.OutputDevice.You should override a method namely
actand List of actions as parameter.Leave the inside of the method empty for now.
As discussed before there is an OutputDevice for a user that is communicating with. And a unique identifier that is representing the user for each OutputDevice. Again just like our InputDevice you need a constructor and uuid as parameter.
Remember the uuid in
MySocialMediaInputwas “MySocialMedia-”+id. Here it is splitted from the original user id that will be using for sending message.Finish the
actmethodNote
In this tutorial, only shy emotion has been used, but there are several emotions you can check
roboy.emotions.RoboyEmotion.javaif you want more!Now you need to tell the dialog system how to use your new in- and output. Refer to Adding generic Input- or OutputDevice in order to tell the dialog system where to find them and how to allow users to activate them. Now rebuild your code, select your Input/OutputDevice in config.properties and run it to see the work you have achieved.
New Memory UUID
If you create support for a new chat service, you will probably need to use uuids in the format “yourservicename-[uuid]”. These must be carefully integrated with the memory in order to avoid confusion of the inter-service interlocutor recognition.
First, check if roboy.util.UUidType already contains a type for the service you are integrating. If not, add it to roboy.util.UuidType in dialog and the attributes necessary for the id to roboy.memory.Neo4jLabel and roboy.memory.Neo4jProperty in roboy memory. (note: CamelCase is not supported for these)
Second, add usage of your new UUID within roboy.dialog.ConversationManager (the section you are looking for is marked with //memory uuid handling`).
Now, an example:
First, we create the telegram uuid: We create a Neo4jProperty by extending the enum at the beginning,
:: we create a Neo4jLabel by extending that enum too, :: public enum Neo4jLabel {
:: then, we create the UuidType and the necessary conversions
:: finally, we add our new service to roboy.dialog.ConversationManager
Telegram: Handle commands
New inline commands can be handled in
onUpdateReceivedmethod which is inTelegramCommunicationHandlerclass.Find the below if code block in onUpdateReceived.
This block is only checking if the incoming message has a ‘/’ at the beginning of the word, just like all the commands “/start”, “/stop”, “/desired_command”
Let’s try to send a sticker after a command catch. Check if the command is “/like”.
Note
Each sticker has its own unique id in Telegram.